

Alright, we continue our adventures in pocketeering and bring you a tutorial that covers relatively uncharted territory in the internet wilderness: How do you add in-seam pockets to a skirt or dress when one of those seams includes an invisible zipper? In a dull moment I thought I could just install the pockets as usual (one to the front and one to the back) and then sew in the zipper as usual (one side on the front and the other on the back). But if you did that, it would be your POCKET that opens with the zipper, instead of the actual SEAM of your skirt. That would defeat the purpose of having a pocket because you couldn’t access it, and would make it much harder to get two human legs inside the skirt!
What you have to do instead is sew the entire pocket to the front of the skirt and thus the front of the zipper only. The other side of the zipper is attached to the back of the skirt with no pocket. That way when the zipper opens, it undoes the whole side seam and the pocket stays out of the way. Capiche?
 (In an ideal world your invisible zipper should match your fabric better than my sample here. No judgies please.)
Because this is somewhat fiddly and a bit of a brain tease, most sewing patterns with side pockets avoid this issue by including a center back seam to the skirt or dress where the zipper will go. This leaves the side seams free for any and all of your pocket-wielding dreams. But what if there is no center back seam, whether your sewing pattern doesn’t include one or you don’t want to break up your fabric print with a seam? Or maybe if, like me, you cut out the front and back of a self-drafted circle skirt without even realizing you’d encounter this issue until it was too late? Option 1 is to be lazy –er– efficient and just omit that pocket altogether. You can still use the other one to stash those CVS receipts or dusty Tic Tacs or whatever it is you put in there. Option 2 is to follow this tutorial and just get it over with so you can have two f’real pockets!
Note: this tutorial assumes you already know how to insert an invisible zipper, as well as know how to sew in-seam pockets. This post is aimed at those who just don’t know how to combine those techniques!
STEPS
1. This tutorial is starting at the point of attaching the zipper and closing up that side seam, which in this case is the wearer’s left side seam. Construction up to this point included sewing the right side seam with normal in-seam pockets, then attaching the outer waistband to the skirt waist.
Finish the raw edges of your pieces as you normally would when sewing in-seam pockets. For me, this means serging the side seams of the skirt as well as around the edges of each pocket bag separately.

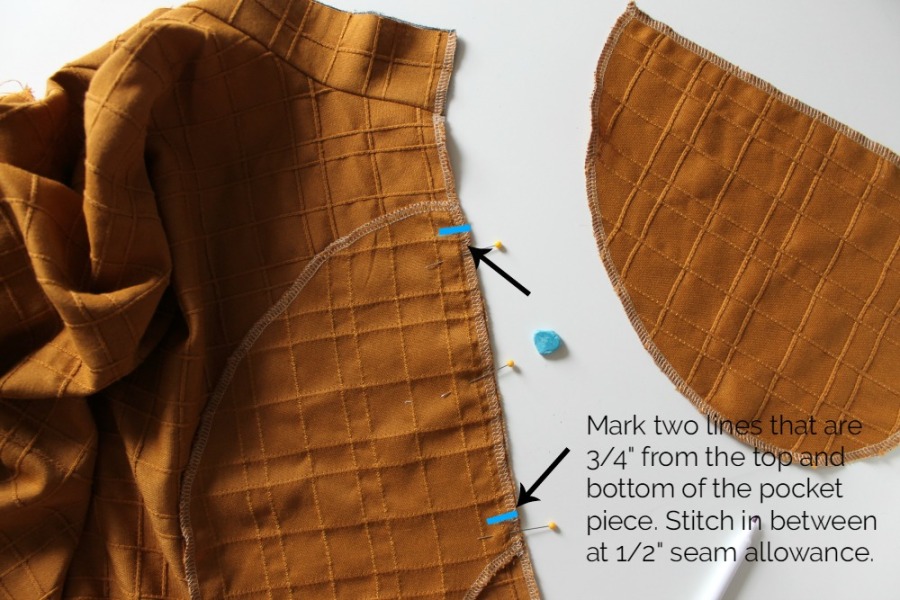
2. Take one pocket bag and place it right sides together with the FRONT of the skirt, lining up the straight edges. Pin in place. Make two marks that are 3/4″ from the top and bottom of the pocket bag. You will be sewing between those two marks. Stitch together at a 1/2″ seam allowance.
3. Flip the pocket out, pressing the seam allowance toward the pocket.

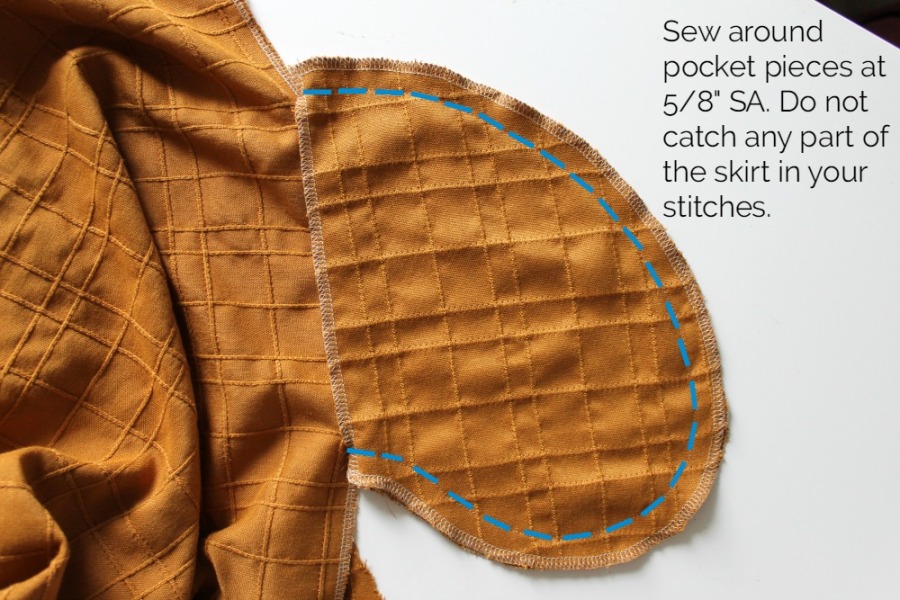
4. Take the other pocket bag piece and place it right sides together with the first pocket that’s already attached to the skirt. You will be pinning and sewing around the edges of the pockets ONLY. Try to keep the rest of the skirt out of the way. This should be pretty easy to do because you left those gaps at the top and bottom of the seam in step #2. Keep all edges aligned and make sure nothing folds or flips over.

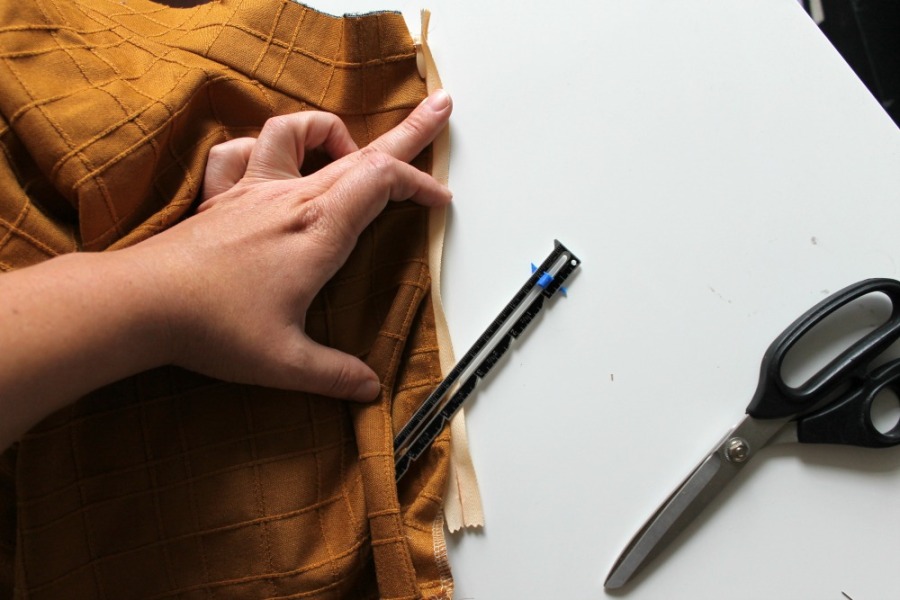
5. Flip the pocket pieces toward the right side of the skirt to reveal the seam allowance where the first pocket piece was attached to the skirt. Clip into the seam allowance at your original two marks. Get close but make sure you don’t snip your actual stitches.

6. Turn the pocket bags over to the wrong side of the skirt. The clips you made in step 5 will allow you to flip the seam allowances out flat above and below the pocket. Press in place.

7. Apply some Fray Check, if you have some, to the corners where you clipped the seam. This will help prevent the raw edge from poking out and fraying after your zipper has been attached.

8. Align your zipper with the exposed edge. The steps of attaching the invisible zipper remain the same as usual. The only thing you have to be aware of with this first pass is stitching directly over the clipped corners, and making sure you’re not stitching the pocket opening shut. Double check as you pin everything. You may have to maneuver the zipper tape strategically around that corner.

Stitch this side of the zipper in place and zip it up to check that you achieved the correct placement.
9. Finish sewing in the rest of the zipper and close the seam below it. That’s it! Now you have a fully functioning pocket AND a zipper that’s nice and tidy in the seam.

Complete your skirt and have a twirly party! This fabric is weird, right? It reminds me of a tablecloth but I have been known to enjoy wearing home goods.

If you live in the Philly area and want to learn to draft your own circle skirt like this, we at Butcher’s Sew Shop have a rotating schedule for this skirt making class. The next one starts November 5th!
xo, Andrea

Hi there, your tutorial is wonderful and I don’t think the fabric is weird at all! Actually, I think it has a very cool vintage touch. I am learning to become a dressmaker and recently we learned the side seam pocket just the way you described (except for the zipper). I wanted to check the steps again and looked up in my sewing books and was totally surprised that I didn’t find this way shown nowhere. Everywhere I checked the bags would be sewn separately to the front and bag and sewn together only after that. I thought that this actually easier because I also was always afraid of closing the pocket opening but now I see what a cool technique this is in combination with the hidden zipper! Thanks for the great tutorial 😊
Eva
[…] Wir sind uns einig, dass die erste Version einfacher ist. Warum sollte man sich also die Mühe machen und die zweite Version benutzen? Nun, zuerst wusste ich das auch nicht, aber dann habe ich diesen Post von Butcher Sew Shop gelesen. […]
[…] Why should I go for the more complicate version? To be honest, I didn’t knew the answer myself, until I saw this post from Butcher Sew Shop. […]
[…] Why should I go for the more complicate version? To be honest, I didn’t knew the answer myself, until I saw this post from Butcher Sew Shop. […]
Thanks. Really useful tutorial. Just what I needed. I live in the UK, but if I lived in Philly, Butcher’s Sew Shop would be my second home.
Thanks for this. I prefer side zips on dresses and was trying to get my head around how to include pockets AND a side zip on a dress that didn’t have either in the original pattern. Your pictures are super helpful.
Thank you so much for taking time to do such a helpful tutorial. I haven’t seen instructions to accomplish both pocket and zipper at the side of a skirt and was going to try to figure it out, which wold leave me very gritty indeed. Your explanation is clear, organized and actually makes sense. And I’m so glad I found it. Thanks again. And, I’m Eva Borgnor – I like the fabric.
Aileen Elgie
[…] I added pockets to this one. It was my first time doing pockets with a side zipper. I used this tutorial from The Butcher Block. […]
Thanks for the awesome tutorial! I have a print and a dress that I wanted to add pockets to and needed a side zip so this is perfect.
By the way, you can change out the zipper pull with something else that might match better—-Michael’s and AC Moore always feature some beads you could attach instead so it could be blinged out or something more matchy-matchy. You could also get enamel paints from a craft/hobby store (like the ones boys use on their airplanes and car models) and touch it up.
[…] find a couple of blogs that helped me out, most notably sewVeraVenus for drafting the skirt and Andrea at The Butchers Block for working out how I could have both a side seam zip and […]
Thank you for this tutorial, just what I was looking for. I design all my clothes so haven’t a reference for this. I struggle to do zips up that are at the back and always need pockets so was pleasantly surprised when I found this after searching for a whole minute. It’s a lot easier than I thought it would be.
[…] side-seam zipper was a mix of rocket science and black magic fuckery… I seriously regret not looking up a tutorial.. But hey, baste, rip, re-baste, and repeat until you achieve the desired results, right? I […]
This is so easy to understand, and *exactly* what I needed right now. I moved a center back zip to a less obtrusive side zip, and remembered half way through that I had also added pockets. >_< Thanks for the rescue!
Love you guys. Thanks for the help.
Your tutorial was just what I needed. Thank you for rescuing me. I couldn’t find the solution how to combine a side seam pocket and an invisible zipper. Your pictures and your explanation were a big help. Can’t wait to try this method.
L. von fabricandacuppa
[…] sliced bread… or Liberty fabric?! 😉 I am just going to have to make them again and use this tutorial to have a zip and pocket in the same seam! […]
Thank you for the tutorial on the zipper and pocket in the same seam. This technique is the first I’ve seen after years of sewing. The contrasting colors, in teaching, is very helpful. Sometimes I have made the pocket longer – to actually hold items such as phone or keys etc.- also taller to catch under the waistband -this helps bear the weight and the side seam doesn’t sag.
Thank you for the tutorial on the zipper and pocket in the same seam. The contrasting colors, in teaching, is very helpful. Sometimes I have made the pocket longer – to actually hold items such as phone or keys etc.- also taller to catch under the waistband -this helps bear the weight and the side seam doesn’t sag.